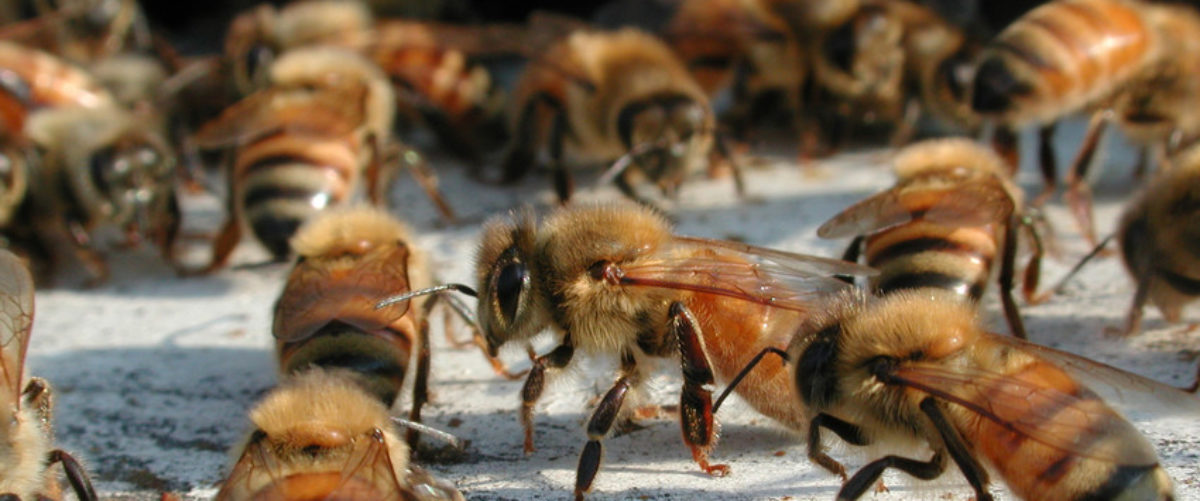
Starting Beekeeping | Beekeeping Information Index
Mid-Atlantic Apiculture
Methods of Starting
(From Fundamentals of Beekeeping)
Buying Established Colonies
Nucleus Colonies
Package Bees
Collecting Swarms
Queens, package bees and Nuclei
Buying Established Colonies Purchasing established colonies is often done by experienced
beekeepers, but it is not recommended for beginners. Problems
associated with buying used equipment and bees include determining
the true market value, the potential of picking up disease, and
getting equipment that is highly variable in condition and possibly
not of standard dimensions.
While financial returns from an established colony are realized
in the first season, beginners usually are not ready to manage
a full-strength colony. Purchasing a small unit, either package
or nuc, in the spring allows the beginner's Beekeeping skills
to develop as the colony size increases during the season.
Top of page
Nucleus Colonies
A nucleus colony, or nuc, is essentially a miniature hive consisting
of bees in all stages of development, as well as food, a laying
queen, and enough workers to cover from three to five combs. When
placed into a full-sized hive body and given supplemental feeding,
the nuc usually expands rapidly into a strong colony. Frequently
these hives produce surplus honey in their first year. The obvious
advantages of starting a hive with a nuc rather than a package
are: the faster rate of development due to the presence of brood
and no break in the queen's laying cycle; ease of establishing
the unit in your own equipment; and a chance to see the nuc before
purchasing it. Sales of nucs have increased tremendously over
the past few years and are making inroads into the well-established
package bee businesses.
While nucleus colonies are initially more expensive than packages,
often their financial re turns at season's end more than make
up for purchase price differences. The biggest disadvantage in
purchasing a nuc is the potential of disease transmission. Even
though inspection and certification of nucs are either recommended
(intrastate movement) or required (interstate movement), disease
can still break out among some nucleus colonies soon after they
are purchased. Bees which have been fed antibiotic drugs may appear
healthy at the time of inspection, but the combs may be contaminated
with disease-causing organisms. If the buyer does not continue
the drug feeding program, it will be only a matter of time until
the disease is seen.
The strength of nucs varies a great deal from source to source
for an equal number of frames. Population differences are partly
due to how long the nuc has been made up and partly to the industry's
lack of well-defined guidelines for making up nucs. One beekeeper
may provide one frame of brood in a five-frame nuc, while another
will provide three. Before purchasing nucs, be sure that their
price reflects the strength of the nucleus colonies.
Top of page
Package Bees
Package bees are produced in the southern states and California
for shipping to northern beekeepers who wish to strengthen weak
colonies or develop new colonies in the spring. Packages are available
in either 2-, 3-, 4-, or 5-pound sizes. The most popular packages
used in Pennsylvania are the 2- and 3-pound sizes. Each pound
represents about thirty-five hundred bees. A queen is included
in those packages to be used for developing new colonies. Packages
intended for strengthening weak colonies may be ordered with or
without a queen.
Packages should be ordered in January or February to ensure timely
delivery. If packages are to be installed on drawn combs containing
honey and pollen, they should arrive in early April; if they are
to be installed on comb foundation, they should arrive in late
April or early May. Beekeepers in northern Pennsylvania may need
to delay shipments for a couple of weeks. Package bees often die
if installed on foundation in cold weather. Temperatures below
57°F will not allow bees to break cluster and move to feeders
for syrup. Bees clustered on combs of honey, on the other hand,
do not have to break cluster in order to eat.
Standard wooden shipping cages measure about 6 x 10 x 16 inches,
with wire screen on the long sides for ventilation. A number three
can containing a food supply of 50 percent sugar syrup is suspended
from the top of the cage. A few small holes are made in the bottom
of the can through which the bees feed. A young mated queen is
housed in a separate cage that is suspended at the top of the
package next to the feeder can. Two or three worker bees (attendants)
commonly are caged with the queen to care for her. Queen cages
usually are supplied with a food source of sugar candy. Packages
are braced about a foot apart to protect them from crowding and
overheating during shipping.
The best way to get packages is to obtain them from a beekeeper
or supply dealer who has a truck going south to bring back a load.
Otherwise, packages will be shipped by parcel post. The beekeeper
should alert officials at the post office about the expected date
of arrival and should request immediate notification.
Upon arrival, package bees should be inspected for unusual numbers
of dead bees. Some bee mortality is normal but when dead bees
accumulate more than 1/2 inch in the bottom of the shipping cage
or when queens are received dead, a damage claim should be tiled
with the postal clerk immediately, noting their condition. This
statement should then be sent to the shipper so that losses may
be replaced.
Package bees are perishable, so handle them with care and protect
them from wind and cold when taking them home. If packages arrive
when the temperature is below 45°F, cover them with burlap or
paper while in transit. if transported in a closed truck or car,
no extra protection is needed.
You should try to install packages as soon as they arrive, although
you can delay installation for up to forty-eight hours with little
difficulty. Feed the bees as soon as you get them home and before
installing them. Spray or sprinkle the cage screen with 50 percent
sugar syrup, preferably in a room where the temperature is around
70°F. Avoid brushing the syrup onto the screen, as this may injure
the After feeding the bees, store them in a cool, dry, and preferably
dark place, such as a basement, porch, or garage. Storage temperature
should be around 50° to 60°F. The bees will recluster around their
queen and become quiet. Package bees soon die if they are stored
where the temperature is above 80°F, or if they are left standing
in the sun. Be sure that there are no Vapona® impregnated strips
near the stored packages.
Before the packages arrive, your hives should be assembled, in
place, and ready to receive them. Package bees should be installed
in late afternoon or early evening, when there is little opportunity
for flight. On cool days, package bees may be put into hives at
any time. If the bees are well fed, they are much easier to install.
Start by opening the empty hive, and remove six consecutive combs.
Insert the entrance reducer so as to provide the smallest opening.
Then close the entrance completely by placing some green grass
in the small opening. (See Figure 9.) This will keep the bees
in the hive until they settle down and remove the grass. Do not
plug the entrance tightly with dry grass because the bees will
not be able to remove it and may die in the hive.
| Figure 9. A full depth hive body ready to receive a package of bees. Six
combs have been removed and the entrance closed with an entrance
reducer and green grass. |
 |
There are several different ways to install or transfer the bees
from the mailing cage to the hive. One method is to place the
mailing cage in the open space left after removing the six frames,
allowing the bees to exit by themselves to join the queen. The
first step in this type of installation is to remove the square
piece of wood that covers the feeder can. Set the cage into the
hive and quickly remove the feeder can. The queen cage attached
near the feeder can should also be removed and checked to make
sure the queen is alive. Remove the cork or any other covering
from the candy end of the queen cage and make a small hole through
the candy using either a nail or a match stick. (See Figure 10.)
Do not injure the queen. The hole should be small enough to prevent
the bees from coming out immediately, but large enough so the
bees can release their queen in twenty-four to forty-eight hours.
Wedge the queen cage between the top bars of the two combs next
to the mailing cage. Place the queen cage with the candy end up,
so that any worker bees within the cage that die prior to the
queen's release will not block the exit hole. Bees should have
maximum access to the screen face of the queen's cage so that
they can feed her and receive her chemicals. Shake about a handful
or two of bees around the queen cage to expedite movement of the
bees from the package to the combs. During cool weather, shake
more bees on the queen cage to prevent the queen from becoming
chilled. The empty mailing and queen cages should be removed in
four to five days.
 |
Figure 10. Remove cork from queen cage as you prepare to introduce a new
queen to a colony. |
A more popular way to install packages is direct release. Prepare
the hive as described previously. Just before opening the package,
sprinkle both sides of the screened shipping cage with sugar syrup
so the bees wings become wet. (See Figure 11.) Knock the bees
to the bottom of the cage by jarring the package against the ground
or hive. As you remove the feeder can, sprinkle the bees again.
(See figure 12.) Do not overdo the sprinkling in cool weather.
Remove the queen cage, inspect the queen, and place the cage in
your shirt pocket. Gently dump the bees out of the package into
the open space left by the removal of the six frames. (See figure13.)
While the bees fall out fairly readily, you still should jar the
package against the ground two or three times to bring the remaining
bees to one corner of the package. Then shake the remaining bees
into the hive. If the bees' wings are damp with syrup, there will
be little flying. Leave the mailing cage beside the hive overnight
so any remaining bees can escape. Place the feeder can hole of
the cage beside the entrance, touching the bottom board. With
the hive tool, gently level the pile of bees on the bottom board.
You may directly release queens that have traveled with the package
or let the worker bees chew through the candy plug and release
her as described previously. Prior to direct release, sprinkle
a little syrup on the queen through the queen cage screen. Next,
lower the queen cage into the hive close to one of the exposed
combs. Remove the screen with your hive tool and let the queen
run onto the comb or among the bees. Carefully replace the previously
removed combs to avoid injuring the bees and the queen.
 |
Figure 11. Sprinkle bees with sugar syrup or water before you open the package
of bees. (Photo by W.W.Clarke, Jr.) |
| Figure 12. Remove feeder can and queen cage |
. |
One of the most important considerations in developing a strong
colony from a package is to supply plenty of food at all times.
Unless the combs in the hive contain sufficient honey and pollen,
you must feed the bees immediately upon installation. There are
several efficient ways of feeding sugar syrup to your colonies.
 |
Figure 13. Shake the bees into the hive and replace the frames |
| Figure 14. Sugar syrup is introduced and the frames have been replaced |
. |
One of the easiest methods of getting food to your packages is
to invert a feeder can or plastic jar over the hole in the inner
cover. You can make this feeder by punching ten to fifteen small
nail holes in the lid of the jar or can. Surround the feeder with
an empty hive body and replace the outer cover. Leave the hive
alone for at least five days, except to refill the feeder as needed.
After seven to nine days, examine the hive briefly to see if the
queen is accepted and laying. Use only a little smoke and handle
the bees and equipment gently. If either the shipping or queen
cage remain in the colony, you should remove it at this trine.
Check a frame or two for eggs and larvae. If you find a colony
without a queen you should give it another queen without delay
to avoid losing the entire colony. If it is impossible to obtain
a new queen immediately, the only practical recourse is to combine
the package with a queenright package or colony.
Package bees also can be installed over a double screen on top
of an established strong colony. The warmth of the lower and supporting
colony improves colony development. Hive the package by the direct
release procedure and provide an entrance to the rear of the colony.
During the first twenty-one days after installation, a package
bee colony experiences about a 35 percent loss in population.
This loss occurs because workers require twenty-one days to develop
from eggs, during which time the older bees of the population
die. after this period, the rate of emergence of young workers
begins to exceed the rate of death of older bees and the population
grows. About four weeks after installation the population is completely
restored. To compensate for the initial shrinkage in package bee
colony size, beekeepers should try to give each package a frame
or two of capped brood. The capped brood helps increase the population
of young bees and stimulates growth of the colony. The major objection
to giving package bees brood is the possibility of spreading disease
to the new unit.
Newly hived package bees are very susceptible to nosema disease,
which often leads to queen supersedure or queenlessness. Feeding
fumagillin medicated syrup to newly installed packages is highly
recommended. (See "Nosema Disease.") About one and a half to two
months after installation, when the package bee colony requires
additional space, you should place a super of frames on top of
the brood chamber.
Top of page
Collecting Swarms
Collecting honey bee swarms in the spring is an excellent way
to replace winter losses, strengthen weak colonies, or start new
ones. Primary swarms are valuable; they may get as many as twenty-five
thousand bees plus the queen. In comparison, a 3-pound package
will give you approximately ten thousand five hundred bees. Three
considerations to keep in mind before attempting to collect a
swarm are how long the swarm has been there, where the swarm is
located, and how big it is.
Swarms normally cluster on a tree limb, shrub, fence post, or
on the side of a building. When possible, cut down the swarm gently
and put it directly into a hive or enclosed container to transport
it to a new hive or location. If the swarm cannot be cut down,
either shake or scrape the bees into a lightweight box. When a
swarm settles in a very high tree, or on any other inaccessible
structure, it is best to leave it there since it is often an after
swarm with a virgin queen. Sometimes you can knock these high
swarms into a bucket at the end of a long pole. The success rate,
however, is very low.
Introduce the swarm into your own equipment by either shaking
or dumping the bees into an open hive or in front of it. (See
Figure 15.) If you were successful in getting the queen with the
rest of the swarm, the bees will enter the hive and make themselves
at home. It is better to use drawn combs than foundation when
introducing swarms.
 |
Figure 15. Swarm of honey bees that has been shaken in front of the hive.
(Photo by W. W. Clarke, Jr.) |
Taking Bees out of Trees and Walls of Buildings. Honey bee colonies and their combs can be transferred from a
tree or wall into a hive. In many situations the beekeeper is
providing a service and should charge for it. Because of the amount
of work involved and the difficulty of obtaining good combs, you
should avoid this method of obtaining bees unless you have no
other alternative. The best way of removing a colony from a wall
is to remove the siding or other exterior coverings to expose
the colony. Then the combs and bees can be cut and brushed or
vacuumed from the interior of the wall.
If it is impossible to expose the colony, you may proceed to trap
the majority of the bees out of the tree or wall. The first step
in trapping bees is to dose up all flight holes except one. Place
over the open flight hole a cone of screen about 6 inches long,
with an opening 1/4 inch to 3/8 inch in diameter at the apex.
Near the flight hole place a weak hive consisting of two or three
frames of brood and bees with a queen or queen cell. In principle,
the bees from the colony in the wall can leave freely through
the screen cone but cannot return to the old nest, so they will
enter the new hive prepared for them. It will take about a month
for the brood in the old combs to hatch. By this time, most of
the bees will be in the new hive. Keep in mind that it is impossible
to trap out all of the bees or the queen.
After most activity from the old hive has ceased, remove the screen
cone and leave the new hive in position for a week or longer.
If no honey flow is in progress, the bees from the strong hive
will rob out the old combs in the wall or tree. After the robbing
has ceased, seal off the entrance to the old nest so that future
swarms cannot establish themselves in the same location.
The hive on the platform should be removed in the evening when
all the bees are inside. To avoid the possibility of the hive
bees returning to their original location, move the hive at least
three miles away.
Related Topics:
Queen and Package Bee Suppliers
Queens, package bees and Nuclei
Top of page
Starting Beekeeping |Beekeeping Information Index
Apiculture Northeast